
How I plait our pony's mane and tail! A step-by-step guide...
Lots is going on for children and their ponies during the summer holidays with pony clubs etc so I thought it was the perfect time to show you how I plait our pony's mane and tail!
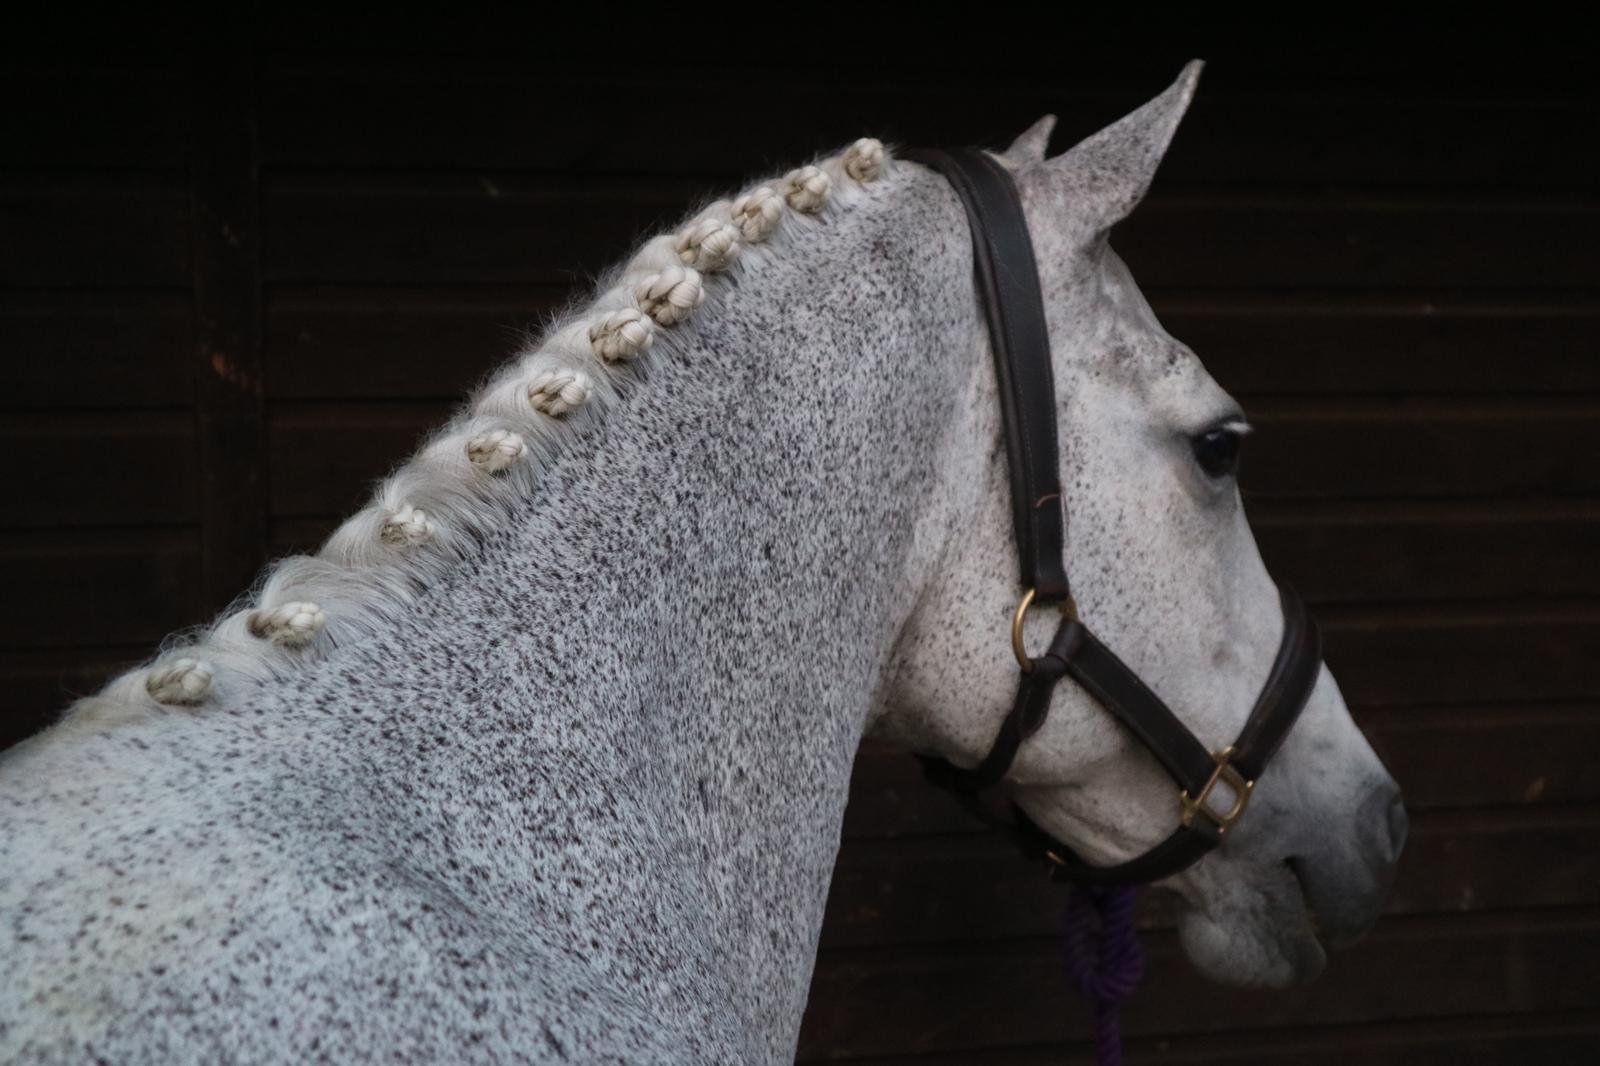
I have my lovely girl Cassie making a cameo in this week's blog post & videos - she was so well behaved bless her heart!


First up, Cassie's mane.
The first thing I do is slightly dampen the mane, then divide into sections.
Now I am all about good luck, so I always make sure we have an even number of plaits, including the forelock. An odd number throughout the mane, then the forelock makes it even.
Get your elastic bands ready and within easy reaching distance.
Start to section the mane. This takes a little time, and sometimes you will need to go back and adjust the amounts in each section. Cassie, in particular, has been rubbed and has a hole which makes it difficult to plait.

The size of your plaits depends on what you are doing.
We do sidesaddle, so in this tutorial, we are creating plaits for showing.
Make sure each piece is evenly divided and probably about 2 inches in width per plait, once rolled up we don’t want golf balls!
Now you can do many different plaits in different ways, plaiting itself is a bit of a fashion, but for dressage, they do tend to be a little skinnier.
I am a traditional girl so I do it the way I learnt when I was young and competing.
Go for larger sections in thinner areas and thinner through the thicker, this should help to even out the plaits once you have them rolled.
When you divide mane, make sure you get a straight line in-between.
You can use a comb, I use my fingernails which just comes with practice!
Start plaiting each section downwards, in a normal plait style.
I make these really tight - sometimes I even cramp up my hands doing so!
I just find the tighter the better.
You want to plait pointing downwards, so it lies nice and evenly when you go to wrap them up.
When you get to the bottom of the plait, secure with elastic.
Some people only use elastic to plait, some use just thread. I use both.
I secure ends with elastic and then thread to stitch the plait up.
Catch the ends of the plait in the elastic as you are securing, and poke them up to stop any hairs sticking out when rolled.
Keep the tension even throughout, and make sure you are creating the plait in the middle of the sectioned off hair, don’t pull to one side or the other.
After you've secured the bottoms with the elastic, get your needle and thread. Pop a knot at the bottom of the thread, poke the needle in just above the elastic band, then either roll or fold depending on the length.

If you’ve got a beautifully even mane, you can be very exact with every plait. Otherwise, you have to adapt your rolls and folds!
Move up and down with the thread, holding the rolled plait really tightly.
Make sure the end that you turned up is inside secure so no hair has a chance at poking out.


Using sharp scissors, snip as close as you can to the thread.
Any whisps of hair still poking out can be trimmed for competitions, but I don't like to trim if not necessary - this is where hairspray becomes my best friend!
Plaiting the tail
https://www.youtube.com/watch?v=t7AH9tdNBcY&feature=youtu.be
I used to practice plaiting on my dolls in the car during long journeys to Scotland before the days of iPad and films! I would spend hours doing it, and I absolutely love it. That love didn't stop when I used to do a lot of showing, and I still adore doing it as much now!
I start by washing Cassie's tail using NAF blue shampoo, but blue standard washing up liquid works too!
I then spray with NAF Mane and Tail Conditioner and Detangler, throughout the ends before brushing through. I don't use this on her mane as it makes it impossible to plait with!

Once again, get your elastic bands ready!
When I plait the tail, I always start from the left, get about a 1cm thick piece, pull one piece of hair from the left, and then two pieces of hair from the right - not one from the right and one from the middle. The hair in the middle isn’t good hair to use.
Start your normal plait, every time adding in new pieces as you would with a french plait.
Pieces from each side should be a similar thickness, not huge chunks, and nice and even.
Keep an even tension as you plait, going from left to right making sure you take even amounts and small sections.
Don't pick up too much hair at any point, you want to keep it very fine and delicate and the same on each side. Add it into plait in the middle as you go.

You will know when you should start thinking about stopping the plait when you get just above the dock bone of the tail. As you get lower, when you pick up pieces, miss a little bit and pick up a piece a little further down otherwise the plait will be angled in a V at the bottom. That way it comes across at a nice straight stop rather than pointing downwards.
Now plait the pieces you are still holding into a long plait ready to finish it off neatly.
Get down to almost the bottom and secure with an elastic plaiting band.
Poke the end of the plait into the underside of the larger plait - so you are left with a plait ‘loop’
Get yourself a piece of thread and a needle, knot the end and stitch up and down through the loop into a flat plait to finish.

Snip off any excess thread.
You can use a sewing 'quick-unpick' to take the thread out at the end of competitions.
Use hairspray to settle down the top bits, or dampen slightly and use a tail bandage before shows.
I hope you've found this super useful! And that you and your ponies are all enjoying being together during the holidays!
Love,